« Previous 1 2 3 4
Operating system virtualization with OpenVZ
Container Service
OpenVZ Administration
The vzctl tool handles a number of additional configuration tasks. Besides starting, stopping, entering, and exiting VEs, you can use the -set option to set a number of operational parameters. Running vzlist in the host context displays a list of the currently active VEs including some additional information such as the network parameter configuration (Figure 7).
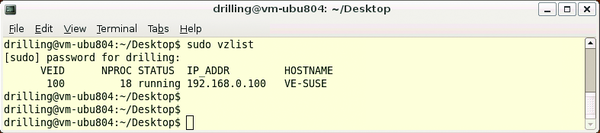 Figure 7: The vzlist command outputs a list of active VEs.
In the VE, you can display the process list in the usual way by typing ps. And, if the package sources are configured correctly, patches and software updates should work in the normal way using apt, yum, or yast depending on your guest system. For the next step, it is a good idea to enter the VE by typing vzctl enter VEID. Then, you can set the root password, create more users, and assign the privileges you wish to give them; otherwise, you can only use the VEs in trusted environments.
Without additional configuration, the use of VEs is a security risk because only one host kernel exists and each container has a superuser. Besides this, you need to be able to restrict the resources available to each VE, such as the disk and memory and the CPU cycles in the host context. OpenVZ has a set of configuration parameters for defining resource limits known as User Bean Counters (UBC) [8]. The parameters are classified by importance in "Primary," "Secondary," and "Auxiliary." Most of these parameters can also be set using vzctl set (Figure 8).
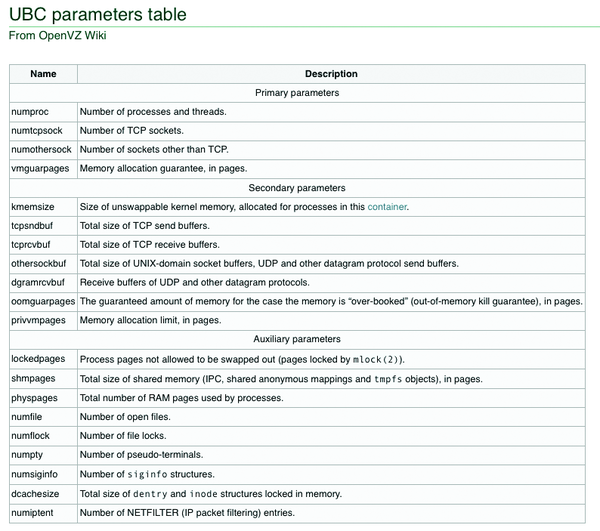 Figure 8: User Bean Counters give the administrator the ability to limit resources for each virtual environment.
For example, you can enter:
sudo vzctl set 100 --cpus 2
to set the maximum number of CPUs for the VE. The maximum permitted disk space is set by the --diskspace parameter. A colon between two values lets you specify a minimum and maximum limit:
sudo vzctl set 100 --diskspace 8G:10G U
   --quotatime 300
Incidentally,sudo vzlist -o lists all the set UBC parameters. Note that some UBC parameters can clash, so you will need to familiarize yourself with the details by reading the exhaustive documentation. To completely remove a container from the system, you just type sudo vzctl destroy.
Conclusions
Resource containers with OpenVZ offer a simple approach to running virtual Linux machines on a Linux host. The virtualization overhead with OpenVZ is only 2 to 3 percent more CPU and disk load according to the developers: This compares with the approximately 5 percent quoted by the Xen developers.
The excellent values for OpenVZ are due to the fact that only one kernel is used. The host and guest kernels don't need to run identical services, and caching effects for the host and guest kernels do not interfere with each other. The containers themselves provide a complete Linux environment without installing an operating system. The environment only uses the resources that the applications running in it actually need.
The only disadvantage of operating system virtualization compared with paravirtualization or hardware virtualization is that, apart from the network interfaces, it is not possible to assign physical resources exclusively to a single guest. Otherwise, you can do just about anything in the containers, including installing packages or providing services. Additionally, setting up the OpenVZ kernel requires just a couple of simple steps, and the template system gives you everything you need to set up Linux distributions quickly.
OpenVZ has a head start of several years development, compared with modern hypervisor solutions such as KVM, and is thus regarded as mature. Unfortunately, the OpenVZ kernel lags behind vanilla kernel development. But, if you are thinking of deploying OpenVZ commercially, you might consider its commercial counterpart Virtuozzo. Besides support, there are a number of aspects to take into consideration when using resource containers. For example, hosting providers need to offer customers seamless administration via a web interface and/or SSH and FTP, and, obviously, the security concerns mentioned previously cannot be overlooked.
Parallels offers seamless integration of OpenVZ with Plesk and convenient administrations tools for, say, imposing resource limits in the form of the GUI-based Parallels Management Console [9] or Parallels Infrastructure Manager [10]. The excellent OpenVZ wiki covers many topics, such as the installation of Plesk in a VE or setting up an X11 system [11]. OpenVZ is the only system that currently offers Linux guest systems a level of performance that can compete with that of a physical system without sacrificing performance to the implementation itself. This makes OpenVZ a good choice for virtualized Linux servers of any kind.
Network Modes
In many cases, a venet device is all you need in the line of network interfaces in a VE. Each Venet device sets up a point-to-point connection to the host context and can be addressed using an IP address from the host context. Venet devices have a couple of drawbacks, however: They don't have a MAC address and thus don't support ARP or broadcasting, which makes it impossible to use DHCP to assign IP addresses. Also, network services like Samba rely on broadcasting working.
Virtual Ethernet devices veth solve this problem (Figure 9). They are supported by a kernel module that uses vzctl to present a virtual network card to the VE. The vzethdev sets up two Ethernet devices, one in the host context and one in the VE. The devices can be individually named and you can manually or automatically assign a MAC address to them. The host-side device can also reside on a bridge to give the VE a network environment that is visible in the host context. Within the container, the administrator can then use Linux tools to configure the network interface with a static address or even use DHCP.
The kernel module is loaded when the OpenVZ kernel boots. You can check that you have it by issuing the sudo lsmod | grep vzethdev command. To configure a Veth device in the container, run:
sudo vzctl set 101 --netif_add eth0 U
  --save
where eth0 is the interface name in the container context. The device name in the host context defaults to vethVEID. If needed, you can assign MAC addresses and device names explicitly. The device can be listed in the host context in the normal way using ifconfig. The number following the dot (0) refers to the device number; here, this is the first Veth device in the container with the VEID of 100:
sudo ifconfig veth100.0
A bridge device is now the only thing missing for host network access; you can set this up host-side by giving the sudo brtcl addbr vmbr0 command and then using sudo brctl addif vmbr0 verth100.0 to bind it to the Veth device, assuming you have installed the bridge-utils package, Host-side you now have the interfaces l0, eth0, venet0, and veth100.0. If the bridge device is set up correctly, brctl show will give you a similar listing to Figure 10. The additional Veth device set up here, 100.1, is for test purposes only and is not important to further steps.
Virtual network devices are slightly slower than Venet devices. Also, security might be an issue with a Veth device; after all, this places a full-fledged Ethernet device in the container context which the container owner could theoretically use to sniff all the traffic outside of the container.
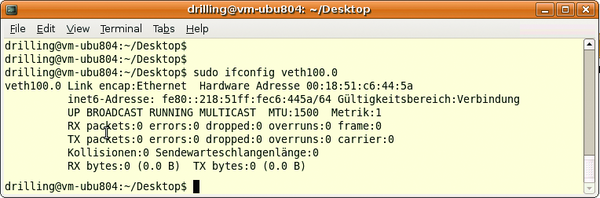 Figure 9: Virtual Ethernet devices make the VE a full-fledged member of the network with all its advantages and disadvantages.
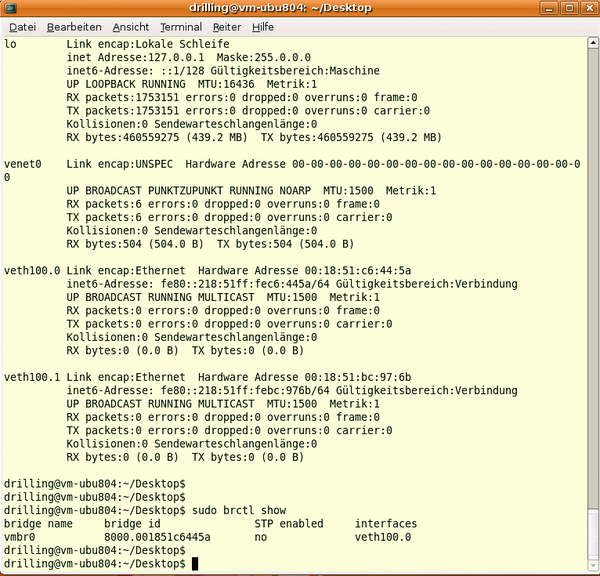 Figure 10: This example includes one Venet and one Veth device in the host context. The latter is physically connected to the host network via a bridge device. The host-side Veth bridge looks like a normal Ethernet device (eth0) from the container context.
Infos
- Linux vServer: http://linux-vserver.org/Welcome_to_Linux-VServer.org
- OpenVZ: http://wiki.openvz.org/Main_Page
- Virtuozzo: http://www.parallels.com/de/products/pvc45
- User-Mode Linux: http://user-mode-linux.sourceforge.net
- OpenVZ quick install guide: http://wiki.openvz.org/Quick_installation
- Creating your own OpenVZ templates: http://wiki.openvz.org/Category:Templates
- Prebuilt OpenVZ templates: http://wiki.openvz.org/Download/template/precreated
- OpenVZ User Bean Counters: http://wiki.openvz.org/UBC_parameters_table
- Parallels Management Console: http://www.parallels.com/de/products/virtuozzo/tools/vzmc
- Parallels Infrastructure Manager: http://www.parallels.com/de/products/pva45
- X11 forwarding: http://wiki.openvz.org/X_inside_VE
- Live migration: http://openvz.org/documentation/mans/vzmigrate.8
« Previous 1 2 3 4
Buy ADMIN Magazine
Related content
-
Operating system virtualization with OpenVZ
 The virtualization technology market is currently concentrating on hypervisor-based systems, but hosting providers often use an alternative technology. Container-based solutions such as OpenVZ/Virtuozzo are the most efficient way to go if the guest and host systems are both Linux.
 -
Container and hardware e-virtualization under one roof
 The Proxmox distribution specializes in virtualization, letting you deploy and manage virtual servers with OpenVZ and KVM at the same time.
 -
Container and hardware e-virtualization under one roof
The Proxmox distribution specializes in virtualization, letting you deploy and manage virtual servers with OpenVZ and KVM at the same time.
- New Beta of Opennode Virtualization
-
Monitoring virtualization environments with Nagios and Icinga
 Special monitoring tools for the virtual environment help you keep on top of things.