« Previous 1 2 3 4 Next »
Operating system virtualization with OpenVZ
Container Service
Configuring the Host Environment
The /etc/vz/vz.conf file lets you configure the host environment. This is where you specify the path to the container and template data on the host filesystem. If you prefer not to use the defaults of
TEMPLATE=/var/lib/vz/template
VE_ROOT=/var/lib/vz/root/$VEID
VE_PRIVATE=/var/lib/vz/private/$VEID
you can set your own paths. VE_ROOT is the mountpoint for the root directory of the container. The private data for the container are mounted in VE_PRIVATE. VEID is a unique ID that identifies an instance of the virtual environment. All OpenVZ tools use this container ID to address the required container.
Creating Containers
The vzctl, which is only available in the host context, creates containers and handles most management tasks, too. In the following example, I used it to create a new VE based on a template for openSUSE 11.1 that I downloaded:
sudo vzctl create VEID U
  --ostemplate suse-11.1-x86_64
The template name is specified without the path and file extension. The sudo vzctl start VEID starts the VE, and sudo vzctl stop VEID stops it again (Figure 5). The commands sudo vzctl enter VEID and exit let you enter and exit the VE.
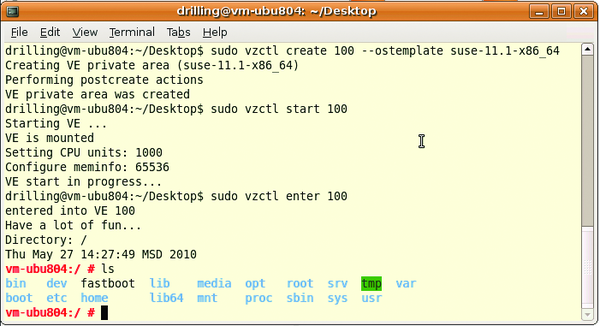 Figure 5: A couple of clear-cut commands are used for creating and starting a VE, and for entering the VE.
Entering the VE gives you a working root shell without prompting you for a password. Unfortunately, you can't deny root access in the host context.
Network Configuration
The next step is to configure network access for the container. OpenVZ supports various network modes for this. The easiest option is to assign the VEs an IP on the local network/subnet and tell them the DNS server address, which lets OpenVZ create venet devices. All of the following commands must be given in the host context. To do this, you first need to stop the VE and then set all the basic parameters. For example, you can set the hostname for the VE as follows:
sudo vzctl set VEID U
  --hostname Hostname --save
The --ipadd option lets you assign a local IP address. If you need to install a large number of VEs, it makes sense to use the VEID as the host part of the numeric address.
sudo vzctl set VEID --ipadd U
  IP address --save
The DNS server can be configured using the --nameserver option:
sudo vzctl set VEID U
  --nameserver Nameserver-address U
  --save
After restarting the VE, you should be able to ping it from within the host context. After entering the VE, you should also be able to ping the host or another client (Figure 6). For more details on the network configuration, see the "Network Modes" box.
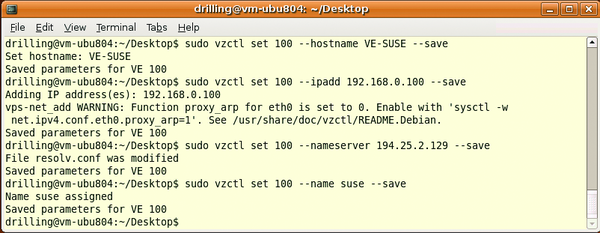 Figure 6: The virtual environment uses Venet devices to communicate with the outside world.
« Previous 1 2 3 4 Next »
Buy ADMIN Magazine
Related content
-
Operating system virtualization with OpenVZ
 The virtualization technology market is currently concentrating on hypervisor-based systems, but hosting providers often use an alternative technology. Container-based solutions such as OpenVZ/Virtuozzo are the most efficient way to go if the guest and host systems are both Linux.
 -
Container and hardware e-virtualization under one roof
 The Proxmox distribution specializes in virtualization, letting you deploy and manage virtual servers with OpenVZ and KVM at the same time.
 -
Container and hardware e-virtualization under one roof
The Proxmox distribution specializes in virtualization, letting you deploy and manage virtual servers with OpenVZ and KVM at the same time.
- New Beta of Opennode Virtualization
-
Monitoring virtualization environments with Nagios and Icinga
 Special monitoring tools for the virtual environment help you keep on top of things.