Virtualization with Microsoft Hyper-V
Hyperspace
Hyper-V, an element of Windows Server 2008 since the operating system was introduced, provides an integrated virtualization solution that doesn't require third-party software [1]. Hyper-V technology gives administrators a powerful, server-based virtualization platform for host systems with x64 CPUs. The Hyper-V can have a role in Windows Server 2008 (R2) or stand alone as Microsoft Hyper-V Server (R2). In Windows Server 2008, Hyper-V is available in the full installation as well as the lean Windows Core installation option.
The requirements Hyper-V places on the hardware shouldn't faze any modern server system today, including support for Intel's VT or AMD's V technology and the ability to enable Data Executive Prevention (DEP) on the BIOS side [2].
On a full install, you can manage Hyper-V locally with Hyper-V Manager, part of the Server Manager console (Figure 1). For core installations without a GUI, you can manage Hyper-V across the wire from any Windows Vista, Windows 7, or Windows Server 2008 (R2) system. Hyper-V Manager contains a full set of features for configuring the Hyper-V Server and the virtual machines (VMs). A single Hyper-V host can run 32- and 64-bit x64 operating systems (Windows, Linux, etc.) at the same time. The guests that Hyper-V supports include Windows Server 2008 (R2), Windows 7 (Figure 2), Windows Vista Service Pack 1 (SP1) or newer, Windows Server 2003 SP2, and Windows XP SP3, along with non-Windows systems such as SUSE Linux (Figure 3).
Hyper-V stores the content of the guest system's hard disk as an image in a standardized VHD (Virtual Hard Disk) format, the same image format as Microsoft Virtual Server 2005 R2. Existing VMs can be migrated directly from Virtual Server 2005 R2 to Hyper-V after you upgrade. The snapshot function provided by Hyper-V saves changes of the system state so users can revert to a previous state. The snapshot contains the current state of the filesystem and RAM.
Live Migration in Clusters
In failover clustering scenarios, Hyper-V supports live migration between the cluster nodes. Thus, virtual machines can be migrated to other hosts on the fly without shutting down. This setup works both with cluster shared volumes and with SANs or iSCSI solutions. If you use a separate network for cluster communications, make sure that the client for Microsoft networks and file and printer sharing for Microsoft networks is enabled; otherwise, live migration of virtual machines will not work.
New Functions with SP1
Thanks to SP1 for Windows Server 2008 R2, Hyper-V now has capabilities such as dynamic RAM allocation and the RemoteFX new graphics engine, which considerably enhance operations with virtual machines.
RemoteFX is an extension of the Remote Desktop Protocol (RDP), which supports the use of accelerated 3D graphics for hosted desktops (e.g., Windows 7). Because this is hardware acceleration, RemoteFX will work with any application, no matter what technology it uses to access the graphics processor.
On the desktop side, RemoteFX also works with thin clients. If the desktop includes a powerful graphics adapter, the system will use it for RemoteFX. If this is not the case, the RDP client will handle this task.
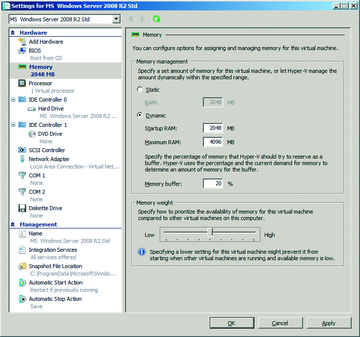
Dynamic memory technology manages memory on virtual machines (VMs) running on Hyper-V hosts (Figure 4). Virtual guests communicate with the hypervisor and tell it their RAM requirements. If the host has enough physical RAM left over, the guests can use it. If not, the hypervisor will inform the virtual machine of the situation, and the machine can use a pagefile. Although the file is on disk, at least the guest knows which RAM sectors it wants to swap out, in contrast to the hypervisor.
 Figure 4: The dynamic memory feature lets the hypervisor allocate memory dynamically during operations.
Time Synchronization
If you experience issues logging in to guest systems that belong to Active Directory, or if you are unable to add an Active Directory user to a local group, the explanation is typically simple: The system times are not synchronized.
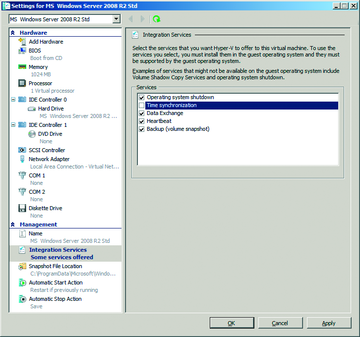
To solve this problem, you can access the virtual machine settings and disable time synchronization between the host and the guest system in the Integration services section (Figure 5). Then, log in to the guest system with a local user account and restart the Windows timekeeping service.
This action will prompt the guest system to synchronize its local time with the primary domain controller. Now you should be able to log in to the domain or add domain accounts to local groups on the guest.


