« Previous 1 2 3
Virtualization with KVM
All for One
X-Ray Vision
The Ctrl+Alt+2 keyboard shortcut toggles to the Qemu Monitor (Figure 6). A special command line lets you tinker with your virtual hardware and retrieve status information. To change the CD or DVD, you must discover the internal name of the drive:
info block
In Figure 6, ide1-cd0 is the only CD drive (typ=cdrom). You can eject the disk by doing:
eject -f ide1-cd0
Then do this:
change ide1-cd0 /tmp/debian.iso
to mount the new medium. Again, you can specify a physical drive instead of an ISO file. You can press Ctrl+Alt+1 to change back to the virtual machine.
Spinning the Web
The operating system on the virtual machine comes with a DHCP server and firewall that use a static IP address of 10.0.2.2. The system can use these details to retrieve a valid IP address using any DHCP client. 10.0.2.2 is also the default address of the host system. If you have an SSH server running on it, you can then use scp as a convenient method of exchanging files.
Although this setup allows the guest system to access the Internet without breaking a sweat, you have no way of accessing the virtual machine from the outside world. After all, the virtual machine is just a normal program from the host system's point of view, meaning that a webserver running on the virtual machine would be inaccessible. Port forwarding is the way to resolve this situation. The host system forwards requests to one of its ports to the virtual machine, and the following command:
qemu -hda windows.img -m 512M -net nic U
   -net user,hostfwd=tcp::5555-:80
sends any incoming requests for TCP port 5555 on the host to port 80 on the virtual machine. If you now point a browser on the host system at the address http://localhost:5555, you'll receive a response from the webserver on the virtual machine. Port forwarding is easily set up in Qemu Monitor:
hostfwd_add tcp::5555-:80
And you can stop it just as easily:
hostfwd_remove tcp::5555
As an alternative to port forwarding, you can use the TUN/TAP device to set up a virtual NIC on the host system and then use a virtual bridge to connect it with the NIC in the virtual machine. This setup is not entirely trivial, and many factors will depend on the distribution you use.
Shunting Station
Just two commands are all you need to move a complete virtual machine from one machine to another without shutting down the machine. This process depends on the target machine being able to access either the disk image or an (older) copy of it. To start the migration, you need to launch Qemu on the target machine with the same parameters used by the active virtual machine:
qemu -hda windows.img -m 512M -incoming tcp:0:4444
The additional -incoming tcp:0:4444 parameter makes sure that Qemu is expecting delivery of the machine by TCP on port 4444. On the source machine, you need to access Qemu Monitor and issue a migrate command:
migrate tcp:192.168.2.106:4444
The IP address belongs to the target machine to which Qemu will now send the virtual machine. After doing this, Qemu stops the source machine. If the target machine works with a copy of the disk image, you can add the cont parameter to continue processing.@KE:
Conclusions
Qemu supports many more parameters and commands both at the command line and in the monitoring tool, most of which are interesting if you're involved in hosting servers. For example, you can suppress screen output from the virtual machines (-nographic parameter), thus restricting the guest systems to text-only output; you can even reroute the output using VNC.
Multiple virtual machines can be grouped on a separate virtual network, which is really useful to test a new infrastructure. All of the functions referred to in this article are also explained in the extremely long manual on the Qemu website [4]. If the command line is too complicated for your liking, you can easily load a graphical front end like AQemu (see the "Push the Mouse" box).
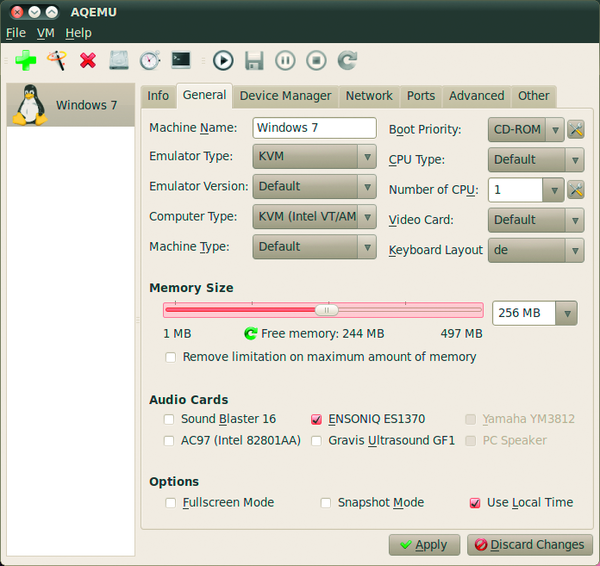 Figure 7: AQemu gives you a fast point-and-click approach to building a virtual machine.
Push the Mouse
The Qt AQemu program is an alternative to Virtmanager. Because the repositories of the major distributions all offer obsolete versions, you should download the latest version off the project website or from SourceForge [7]. You will find both deb packages and .tar.gz archives with a prebuilt AQemu. If in doubt, you can use one of the variants with static in its name and unpack the archive in the root directory:
sudo tar xvfj aqemu-<version>-bin- static-qt-linux-<bit>.tar.bz2 -C /
When AQemu is first launched (by typing aqemu), the First Start Wizard pops up to ask for a couple of basic settings. Press Next to confirm English as your choice of language. Then, in the second window, check Use Device Manager and click Search in the third. The list should now container the current Qemu and KVM versions. Otherwise, you will need to Set Versions Manually.
The main window that then appears looks very much like VirtualBox (Figure 7). In the left-hand column, AQemu lists all your virtual machines, while the tabs on the right show their virtual hardware. To create a new machine, click the green plus sign and assign a name. Then, ensure that the machine is selected in the list and check the tabs from left to right. In the General tab, the Emulator Type must be set to KVM; otherwise, the virtual machine will run at a snail's pace.
The boot order is set in Boot Priority; you can easily set the RAM size using the slider. The value next to Free memory shows you the physical limit. To avoid forcing the host systems to its knees, you should never assign the full amount of physical memory. If the guest system is having trouble with graphics, you can also replace the Video Card.
Then move on to the Device Manager tab, where you can click the hard disk icon and then Create New to create a new image. In the window that then appears, type the file name, set the Size, and click Create. After returning to the main window, you can click the CD icon to add a virtual CD-ROM drive. To do so, either type the device name of the physical CD drive, or the filename of an ISO image, in the box.
After completing the changes, press Apply at the bottom of the screen and then select VM | Start in the menu to launch the virtual machine. If the operating system doesn't want to start, you can try a couple of other KVM functions in the Other tab below KVM Options. You can also disable ACPI power management in Advanced.@KE:
Infos
- KVM project: http://www.linux-kvm.org
- Qemu: http://www.qemu.org/
- List of processors with Intel VT technology: http://ark.intel.com/VTList.aspx
- Qemu documentation: http://wiki.qemu.org/download/qemu-doc.html
- KVM FAQ: http://www.linux-kvm.org/page/FAQ
- KVM mailing list, forum and IRC: http://www.linux-kvm.org/page/Lists%2C_IRC
- AQemu: http://sourceforge.net/projects/aqemu/
« Previous 1 2 3
Buy ADMIN Magazine
Related content
-
Virtualization with KVM
 KVM continues to gain popularity in the world of Linux – so much so, that it has become Red Hat and Ubuntu's preferred virtualization solution. In contrast to Xen, setting up KVM involves just a couple of steps, and the guest operating systems can run without special patches.
 -
Virsh Libvert Tool
With the command-line tool virsh, a part of the libvirt library, you can query virtual machines to discover their state of health, launch or shut down virtual machines, and perform other tasks – all of which can be conveniently scripted.
-
Remotely controllingvirtual machines with virsh
 With the command-line tool virsh, a part of the libvirt library, you can query virtual machines to discover their state of health, launch or shut down virtual machines, and perform other tasks – all of which can be conveniently scripted.
 -
Secure Your KVM Virtual Machines
 A common misconception posits that software cannot cause mischief if you lock the system away in a virtual machine, because even if an intruder compromises the web server on the virtual machine, it will only damage the guest. If you believe this, you are in for a heap of hurt.
 -
Controlling virtual machines with VNC and Spice
 Administrators on Linux virtual machines tend to use VNC to transfer the graphical system to Virtual Machine Manager or a VNC client. One alternative is Spice: If the guest system is running the QXL driver, you can look forward to fast graphics and audio pass through.