« Previous 1 2 3
Exploring Ubuntu cloud tools
Cloudburst
Making Images Available to Your Cloud
Although you can create your own images with a bit of work, you can also download some ready-made images from the Eucalyptus site. The easiest way to find these images is to click on the Extras tab in the web UI and the Eucalyptus-certified Images link. Several images are already included with your Ubuntu Enterprise Cloud installation, which is by far the easiest way to get started.
To get to the provided images, log in to the web interface and click on the Store tab. Initially, you'll just see a single field with a Search button on the left. To see all the images at your disposal, click Search with a blank search field. Each available distribution has a small description, a read more link, and a large yellow Install button (Figure 5).
 Figure 5: Installing images and making them available to your cloud.
These distributions aren't actually on your system and they didn't come with the packages you installed with Synaptic or apt-get. Once the images are installed on the cloud controller, the button changes to Installed with a How to run? link (Figure 6). Click the link to see the instructions in a pop-up window.
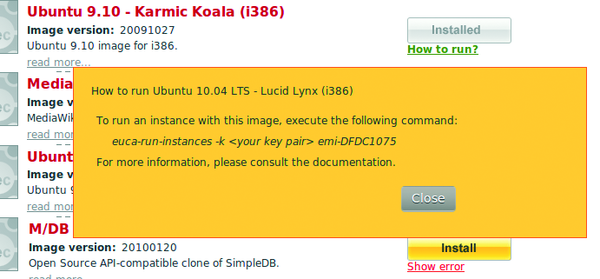 Figure 6: Once installed, the web UI tells you how to run your VM.
Make a note of the command, then click Close to continue. To see what images are available, click the Images tab (Figure 7).
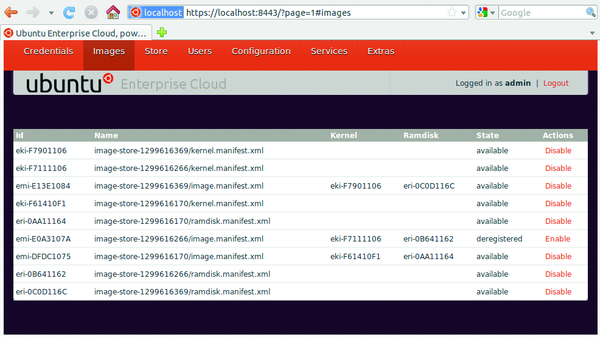 Figure 7: Your machine images, loaded up and ready for use.
Listing 2
euca-describe-images
01 $ euca- describe- images
02 IMAGE   eki- F7901106    image- store- 1299616369/kernel.manifest.xml      admin   available    public          x86_64  kernel
03 IMAGE   eki- F7111106    image- store- 1299616266/kernel.manifest.xml      admin   available    public          x86_64  kernel
04 IMAGE   emi- E13E1084    image- store- 1299616369/image.manifest.xml       admin   available    public          x86_64  machine eki- F7901106    eri- 0C0D116C
05 IMAGE   eki- F61410F1    image- store- 1299616170/kernel.manifest.xml      admin   available    public          x86_64  kernel
06 IMAGE   eri- 0AA11164    image- store- 1299616170/ramdisk.manifest.xml     admin   available    public          x86_64  ramdisk
07 IMAGE   emi- DFDC1075    image- store- 1299616170/image.manifest.xml       admin   available    public          x86_64  machine eki- F61410F1    eri- 0AA11164
08 IMAGE   emi- E0A3107A    image- store- 1299616266/image.manifest.xml       admin   available    public          x86_64  machine eki- F7111106    eri- 0B641162
09 IMAGE   eri- 0B641162    image- store- 1299616266/ramdisk.manifest.xml     admin   available    public          x86_64  ramdisk
10 IMAGE   eri- 0C0D116C    image- store- 1299616369/ramdisk.manifest.xml     admin   available    public          x86_64  ramdisk
Alternatively, you can get the same information from the command line (Listing 2). As you can see, each image consists of three parts: the kernel, the ramdisk, and the image. For the sake of this discussion, I'm going to use those from the Eucalyptus site. Three sets of three commands are needed here: one set for the kernel, one for the ramdisk (if needed), and a third for the image. To prepare the kernel, start with:
$ euca- bundle- image - i kvm- kernel/vmlinuz- 2.6.28- 11- server - - kernel true
Checking image
Tarring image
Encrypting image
Splitting image...
Part: vmlinuz- 2.6.28- 11- server.part.0
Generating manifest /tmp/vmlinuz- 2.6.28- 11- server.manifest.xml
The - i specifies a path to the kernel; yours could be different. If you are using the Eucalyptus images, you'd see both a KVM and a Xen version of the kernel. Take note of this when you enter the command text. When complete, this command will generate a manifest.xml file in /tmp, which you'll need to reference next:
$ euca- upload- bundle - b kernel - m /tmp/vmlinuz- 2.6.28- 11- server.manifest.xml
Checking bucket: kernel
Creating bucket: kernel
Uploading manifest file
Uploading part: vmlinuz- 2.6.28- 11- server.part.0
Uploaded image as kernel/vmlinuz- 2.6.28- 11- server.manifest.xml
The - b flag designates a bucket name for the kernel. Meanwhile, the - m represents the path to the manifest generated in the previous command. Your next step is to register the kernel:
$ euca- register kernel/vmlinuz- 2.6.28- 11- server.manifest.xml
IMAGE   eki- 34E0122C
The result of this final command will be a printed kernel identifier. The format will be similar to eki-34E0122C. Make a note of the second part of the identifier after the hyphen, which you'll need when it's time to upload the image.
When you reload the Images tab in the web UI, your new kernel image will be available, which I'll show you after you've finished setting up your virtual machine. The next step is to bundle, upload, and register the ramdisk (Listing 3).
Listing 3
Getting the Ramdisk Identifier
01 $ euca- bundle- image - i kvm- kernel/initrd.img- 2.6.28- 11- server - - ramdisk true
02 Checking image
03 Tarring image
04 Encrypting image
05 Splitting image...
06 Part: initrd.img- 2.6.28- 11- server.part.0
07 Generating manifest /tmp/initrd.img- 2.6.28- 11- server.manifest.xml
08
09 $ euca- upload- bundle - b ramdisk - m /tmp/initrd.img- 2.6.28- 11- server.manifest.xml
10 Checking bucket: ramdisk
11 Creating bucket: ramdisk
12 Uploading manifest file
13 Uploading part: initrd.img- 2.6.28- 11- server.part.0
14 Uploaded image as ramdisk/initrd.img- 2.6.28- 11- server.manifest.xml
15
16 $ euca- register ramdisk/initrd.img- 2.6.28- 11- server.manifest.xml
17 IMAGE   eri- 85DB1379
Once again, an identifier, this time for the ramdisk, will be generated with a format similar to eri-85DB1379. As with the kernel image, take note of the second part of the identifier.
The only real difference is that the bucket name references a ramdisk instead of a kernel. Now it's time to dust off the kernel and ramdisk identifiers (Listing 4). A couple of interesting things happen with the last command. First, the image is broken up into parts, and second, the image is uploaded, which takes a little time compared with the kernel and ramdisk steps.
Listing 4
Uploading the Images
01 $ euca- bundle- image - i centos.5- 3.x86.img - - kernel eki- 34E0122C - - ramdisk eri- 85DB1379
02 Checking image
03 Tarring image
04 Encrypting image
05 Splitting image...
06 Part: centos.5- 3.x86.img.part.0
07 Part: centos.5- 3.x86.img.part.1
08 Part: centos.5- 3.x86.img.part.2
09  . . . more image parts
10 Part: centos.5- 3.x86.img.part.21
11 Part: centos.5- 3.x86.img.part.22
12 Generating manifest /tmp/centos.5- 3.x86.img.manifest.xml
13
14 $ euca- register images/centos.5- 3.x86.img.manifest.xml
15 IMAGE emi- c658102B
When all three parts have been uploaded, they should now be available, which you can check with the euca- describe- images command (Listing 5).
Listing 5
euca-describe-images
01 IMAGE   emi- C658102B    images/centos.5- 3.x86.img.manifest.xml  admin   available       public          x86_64  machine eki- 34E0122C    eri- 85DB1379
02 IMAGE   eki- 34E0122C    kernel/vmlinuz- 2.6.28- 11- server.manifest.xml    admin   available       public          x86_64  kernel
03 IMAGE   eri- 85DB1379    ramdisk/initrd.img- 2.6.28- 11- server.manifest.xml        admin   available       public          x86_64  ramdisk
Now that you have your machine image(s), it's time to deploy a virtual machine. For now, this is done entirely from the command line.
Run, Image, Run!
When you run your machine, you will want to log on via the secure shell, or SSH. First time out, you can only log in as root, and for this, you'll need a key pair which you must now generate with:
euca- add- keypair keyname > $HOME/.euca/keyname.priv
chmod 0600 $HOME/.euca/keyname.priv
The keyname is a name of your choice. If it makes sense to use a name that matches the hostname of the machine you plan to bring online, go for it. The key is inserted into the new instance and allows for secure, password-less logins. Now it's time to launch an instance of a virtual machine with:
euca- run- instances - k keyname emi- XXXXXXX
You should get a reply from the system that looks like Listing 6.
Listing 6
euca-run-instances
01 # euca- run- instances - k mykeypair emi- E13E1084
02 RESERVATION     r- 3C5D07B2      admin   admin- default
03 INSTANCE        i- 48550849      emi- E13E1084    0.0.0.0 0.0.0.0 pending mykeypair   0m1.small        2011- 03- 09T16:17:26.161Z        cluster1eki- F7901106    eri- 0C0D116C
Although your machine might take some time to come online, you can check its progress with euca- describe- instances (Listing 7).
Listing 7
euca-describe-instances
01 $ euca- describe- instances
02 RESERVATION     r- 33430611      admin   default
03 INSTANCE        i- 4B760828      emi- E0A3107A    192.168.1.101   172.19.1.3      pending      mykeypair       0               m1.small        2011- 03- 09T16:22:36.864Z    cluster1 eki- F7111106    eri- 0B641162
04 RESERVATION     r- 3C5D07B2      admin   default
05 INSTANCE        i- 48550849      emi- E13E1084    192.168.1.100   172.19.1.2      pending      mykeypair       0               m1.small        2011- 03- 09T16:17:26.161Z    cluster1 eki- F7901106    eri- 0C0D116C
Once the installation is complete, all that is left is to log in to the new host with SSH.
ssh - l root IP.ADD.RE.SS
Enjoy your new virtual machine.
Conclusion
As the saying goes, this is just the tip of the iceberg. In addition to the freely available tools described here, Canonical, in partnership with Eucalyptus Systems, can provide assistance, training, and support through Ubuntu Advantage Support. They also offer additional tools to make the job of administering large private clouds easier while providing superb reporting and monitoring tools.
With Ubuntu Enterprise Cloud Services, organizations can take advantage of the power and resources of their existing computing infrastructure, without spending money to deploy additional hardware (not to mention find space for that hardware), by deploying virtual machines as needed in a private cloud. With Ubuntu Enterprise Cloud and Eucalyptus Systems, your machines can find a home in the cloud.
Infos
- Eucalyptus Systems: http://www.eucalyptus.com/
- Ubuntu Enterprise Cloud: http://cloud.ubuntu.com/
« Previous 1 2 3
Buy ADMIN Magazine
US / Canada
UK / Australia
Related content
-
Your own AWS-compatible cloud with Eucalyptus
 If you don't trust the cloud services of Amazon or cannot store customer data there for privacy reasons, you can create your own Eucalyptus cloud that is compatible with the Amazon tools and can be installed in a flash.
 -
Getting started with the OpenStack cloud computing framework
OpenStack brings common virtualization technologies such as KVM, Xen, Hyper-V, and QEMU into the cloud.
-
Setting up an OpenNebula Cloud
The OpenNebula cloud middleware system is one of the easiest private clouds in the sky. We'll show you how to get started.
- HP Buys Eucalyptus