« Previous 1 2 3 Next »
Container and hardware e-virtualization under one roof
Double Sure
Proxmox, Hands-On
The current 1.5 version of Proxmox VE from May 2010 [1] is based on the Debian 5.0 (Lenny) 64-bit version. The Proxmox VE kernel is a standard 64-bit kernel with Debian patches, OpenVZ patches for Debian, and KVM support. To be more precise, three different Proxmox kernels exist right now. The ISO image of Proxmox VE version 1.5 with a build number of 03.02.2010 uses a 2.6.18 kernel version.
For more efficient deployment of OpenVZ or KVM, you might try a more recent kernel release. For example, the official OpenVZ beta release is based on the 2.6.32 kernel. For this reason, Proxmox offers kernel updates to 2.6.24 and 2.6.32.2C (the latter with KVM_0.12.4 and gPXE) on its website; you can install the updates manually after installing Proxmox VE and performing a system upgrade:
apt-get update
apt-get upgrade
apt-get install proxmox-ve-2.6.32
A Proxmox cluster master can also manage mixed kernel setups, such as two nodes with 2.6.24, one with 2.6.32, and one with 2.6.18. If you mainly want to run OpenVZ containers, you can keep to the 2.6.18 kernel. The 2.6.32 kernel may give you the latest KVM version with KSM (Kernel Samepage Merging); however, it doesn't currently offer OpenVZ support. On the other hand, kernel 2.6.18, which is the official stable release of KVM, doesn't offer SCSI emulation for guest systems, only IDE or Virt-ID.
The minimum hardware requirements for Proxmox are a 64-bit CPU with Intel (Vanderpool/VT) or AMD (Pacifica/AMD-V) support and 1GB RAM. Hardware virtualization with KVM allows any guest complete access to the CPU (Ring0) at maximum speed, and with all available extensions (MMX, ET64, 3DNow). You can verify the existence of a CPU with VT extensions after the installation of Proxmox VE by typing pveversion-v at the Proxmox console. If you have the 2.6.24 kernel, the output should look similar to Listing 1.
Listing 1
Kernel 2.6.24 pveversion Output
01 # pveversion-v
02 pve-manager: 1.5-10 (pve-manager/1.5/4822)
03 running kernel: 2.6.24-11-pve
04 proxmox-ve-2.6.24: 1.5-23
05 pve-kernel-2.6.24-11-pve: 2.6.24-23
06 qemu-server: 1.1-16
07 pve-firmware: 1.0-5
08 libpve-storage-perl: 1.0-13
09 vncterm: 0.9-2
10 vzctl: 3.0.23-1pve11
11 vzdump: 1.2-5
12 vzprocps: 2.0.11-1dso2
13 vzquota: 3.0.11-1
14 pve-qemu-kvm: 0.12.4-1
Alternatively, experienced administrators can also check flags in /proc/cpuinfo for entries such as vmx or svm. Missing KVM kernel support is revealed in the web interface by the fact you can only create OpenVZ containers below virtual machines in VM Manager. Additionally, the web interface outputs a message saying Attention: This CPU does not support KVM virtual machines (no Intel VT / AMD-V support) (Figure 2).
 Figure 2: If the CPU doesn't have hardware support for virtualization, Proxmox issues a warning and then only supports OpenVZ containers.
Installing Proxmox
The graphical installer just needs a couple of mouse clicks to talk it into installing the system and doesn't pose any problems. All the data on the hard disk shown by the installer will be lost. Additionally, you can't influence the partitioning scheme, where the Proxmox installer automatically gives you an LVM (Logical Volume Manager) scheme. After choosing the country, timezone, and keyboard layout, specifying the administrative password and manually setting your IPv4 network parameters (Figure 3), the installer unpacks and deploys the basic system.
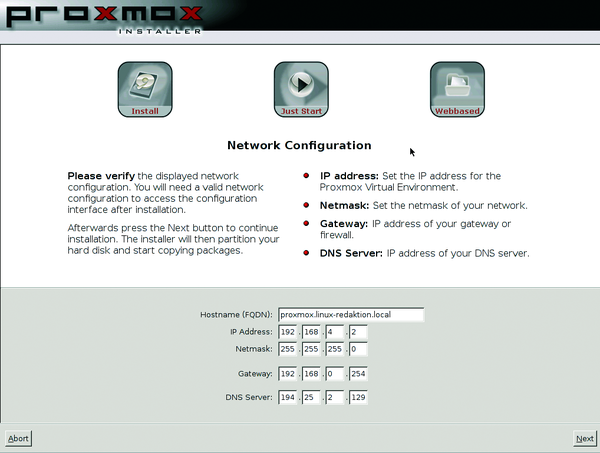 Figure 3: Apart from the network parameters, the administrator has very little influence on the Proxmox VE installation.
Finally, you just click on Reboot and the system comes back up ready for action. You can surf to the IP address you entered during the installation to manage it. After installing the basic system, you will want to log in and update the system by typing:
apt-get update && apt-get upgrade
After the first web interface login, you will see options for switching the GUI language in the System | Options tab, if needed. Watch out for the tiny red save label, which is easy to overlook.
For hardware virtualization with KVM, Proxmox requires a 64-bit Intel or AMD CPU; however, the vendor unofficially offers a version based on a 32-bit Lenny, which only has OpenVZ support [5]. Alternatively, you can install Proxmox on an existing Lenny system [6]. The Proxmox hypervisor has very few open ports (442 for HTTPs, 5900 for VNC and optionally 22 for SSH) and thus a minimal attack surface (Figure 4). You can use the web interface in Administration | Server to decide which services you want to provide.
 Figure 4: Proxmox provides very few externally accessible services.
Templates
Cluster masters, nodes, and virtual OpenVZ containers, or KVM machines, are easily created in the web GUI. To create a virtual machine, you need to access the VM Manager via the Virtual machines menu. However, prebuilt templates (or Virtual Appliances in Proxmox-speak) give you an easier option, and many of them exist for OpenVZ. You can easily download them via the web interface via VM Manager | Appliance Templates . The Download tab takes you to a useful collection of certified templates, such as a ready to run Joomla system in the www section. The Type shows you that this is an OpenVZ template (Figure 5).
 Figure 5: Proxmox offers prebuilt OpenVZ templates in the GUI.
Clicking the template name takes you to an overview page with detailed information. You can click start download to do just that. After this, when you create the virtual machine, you can select the Container Type (OpenVZ) and the template you just installed, debian-5.0-joomla_1.5.15-1 , then type a hostname, a password, and the required network parameters. Then you can and click create to deploy a new virtualized Joomla server in a matter of minutes. Instead of the OpenVZ default, virtual network (venet) , you might want to change to bridged Ethernet, because many web services rely on functional broadcasting. To launch the virtual machine, just click the red arrow in the list of virtual machines in the first tab, List, in VM Manager. If you operate Proxmox in a cluster, you can decide – when you create a virtual machine – which cluster node should house the virtual machine. For more details on networking, read the "Onto the Network" box.
Onto the Network
Proxmox VE works with bridged network devices (Figure 6), which means that all the virtual machines have physical access to the host network, without any restrictions. Additionally, you can also use VLANs (IEEE 802.1q) and bonding configurations. Network configuration is supported by the web interface. Proxmox stores changes to the network configuration in /etc/network/interfaces.new and enables the newly defined devices when you reboot.
Debian typically stores the current configuration in /etc/network/interfaces. In all cases, the installer first creates a single bridge device (vmbr0), which is physically connected to the first Ethernet device (eth0). You can change this binding in the web interface below Configuration | System | Network with a manual entry for Bridge Ports. OpenVZ either uses simple Vnet devices without MAC addresses for its configuration, or the more flexible veth devices established by the vzethdev kernel module, which you can bind to the bridge described above host-side. Bridge and Vnet devices are normally visible in the host context when you type ifconfig. You select the network type (bridge or Venet) to use for the OpenVZ container on the virtual machine itself or when you create the virtual machine.
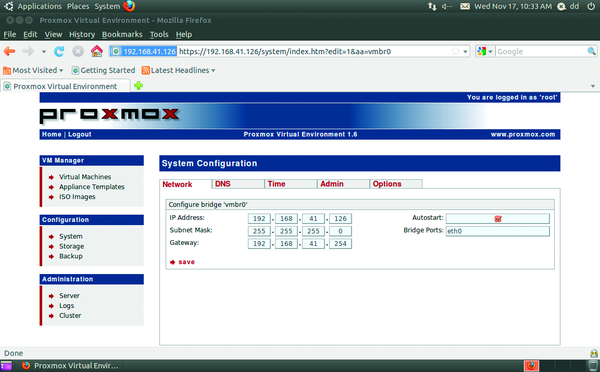 Figure 6: The host network on the Proxmox cluster master uses bridge devices that automatically bind to the first available NIC.
To start the virtual machines, the context menu in the virtual machine list for the selected virtual machine (red arrow) provides a Start item. Additionally, you can click the Open VNC console link in the edit dialog box for the virtual machines to tell Proxmox to open a Java VNC client in a pop-up window in your browser. You can then use the VNC client to quickly and easily log in to the virtual machine (Figure 7). At this point, you can easily customize the virtual machine to match your requirements. If you opted for a bridged Ethernet device on creating the virtual machine, you only need to assign the required IP address and possibly the default gateway to the virtual NIC eth0.
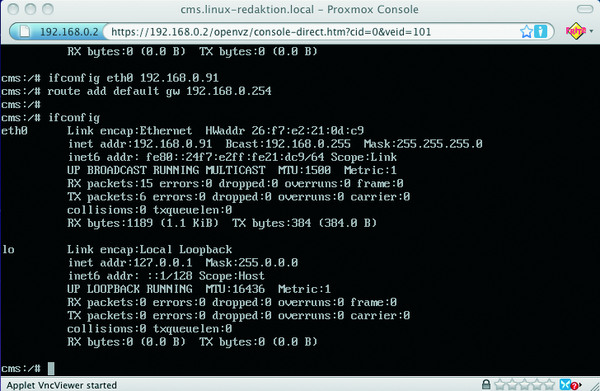 Figure 7: Using the built-in Java VNC client to check the functionality of each new virtual machine with a console login. From now on, the administrator can easily log in to the new virtual machine, using SSH, or over the local network.
« Previous 1 2 3 Next »
Buy ADMIN Magazine
Related content
-
Container and hardware e-virtualization under one roof
 The Proxmox distribution specializes in virtualization, letting you deploy and manage virtual servers with OpenVZ and KVM at the same time.
 -
Proxmox virtualization manager
 Proxmox has been working for years on their virtualization manager that does not require a cloud. We look at the improved reliability and new features in version 5.0.
 -
Automating deployments on Proxmox with OpenTofu and cloud-init
 Use OpenTofu and cloud-init to deploy virtual machines in a Proxmox hypervisor and populate them automatically with services.
 -
Operating system virtualization with OpenVZ
The virtualization technology market is currently concentrating on hypervisor-based systems, but hosting providers often use an alternative technology. Container-based solutions such as OpenVZ/Virtuozzo are the most efficient way to go if the guest and host systems are both Linux.
-
Operating system virtualization with OpenVZ
 The virtualization technology market is currently concentrating on hypervisor-based systems, but hosting providers often use an alternative technology. Container-based solutions such as OpenVZ/Virtuozzo are the most efficient way to go if the guest and host systems are both Linux.