« Previous 1 2 3 4 Next »
Aggregating information with Huginn
Smart Collection
Point and Click
Installation is finally complete. In the future, Huginn and Nginx will start automatically at system bootup. To manage Huginn, the admin calls it in the browser. If it is running on the local system, you should see the page shown in Figure 2 after typing localhost into the address bar. Clicking Login and entering username admin and the supersecret password puts you in the user interface, where you should change the password under Account | Account and enter the correct email address to which Huginn later sends the summary.
In Huginn, agents collect and process data from websites, and users manage these with the Agents
menu option (Figure 3). For example, the XKCD Source
agent regularly checks for a new XKCD comic, and the Afternoon Digest agent sends email to the user every evening. The arrows in the first column indicate whether the agent collects data (left arrow) or outputs data (right arrow). A double arrow means that the agent both receives and outputs data.
The Schedule column tells you when the agent is active, and the Working? column needs a green Yes here for the agent to work. You can launch an agent manually using Actions | Run on the right end of the agent line.
When an agent has collected data, it generates an event that is typically the raw data (i.e., the title and description of the current XKCD comic, among other things in the example). The Events menu item lists all the events (Figure 4). The list is initially empty, but later, the content of the respective event and the information collected can be displayed by selecting Show .
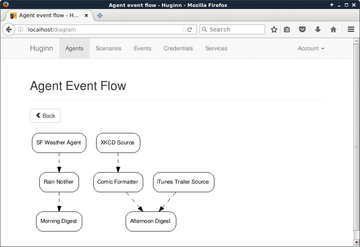
The events serve as a data source for other agents. For example, the Comic Formatter , which wraps the title of the comic in HTML tags, converts the information retrieved from XKCD Source . Because it waits for the events from XKCD Source , it automatically processes the delivered data. If the agent fails to react to an event, you can resend the event with the Re-emit button. Clicking Agents | View diagram reveals which agent passes its data to another agent (Figure 5).
 Figure 5: The XKCD Source agent passes the XKCD comic description to the Comic Formatter, which hands over the neatly formatted text to the Afternoon Digest email agent.
Because the view can become cluttered if you have a large number of agents, Huginn groups them, describing the groups as scenarios. For example, Huginn groups all the agents that tap into Twitter into a scenario named Twitter , whereas the agents in the second scenario, Weather , unsurprisingly process the weather data. You can freely decide how many scenarios to set up and how to distribute the agents across them. The Scenarios menu option lists the existing scenarios. Huginn comes with a standard default-scenario . Clicking on a scenario displays the agents it contains, and clicking New Scenario creates a new one. Anyone who thinks that scenarios are too complicated can simply ignore them.
007 Colleagues
To create a new agent, select Agents | New Agent . Below Type , decide which data the agent should fetch or process. In addition to specialized agents (e.g., that access Twitter), agents can be used for general tasks. For example, Website Agent cuts text from any web page, and Rss Agent taps into a newsfeed. Finding the right type for a desired action is not easy, because Huginn does not sort the list alphabetically. You can use the input field to search for the name or activity of the targeted service.
After selecting the type of agent, a description of the agent appears in the gray box on the right (Figure 6). On the left side, you add a short description in the Name box. Schedule determines when, or at what intervals, the agent does its work. Huginn remembers generated events forever. If there are many, it can quickly use up the available disk space. An agent can thus delete older events, if necessary. The setting under Keep events determines when this happens. Make sure not to choose too short a time interval, because this is the only way to give other agents a chance to keep processing events.
If an agent adopts another agent's data, you need to specify this agent as a data source below Sources . Similarly, Receivers groups those agents to which other agents transfer data.
To select an agent, click on a free area of the input field and select a suitable one. The list only offers you the existing agents. If you want to add additional agents as sources or receivers, click again in an empty area of the input field. Checking the box next to an agent's name lets you remove it. Along the same principle, you can choose the desired scenario under Scenarios . In case of doubt, just go for default-scenario .
The settings under Options are a function of the respective agent. For example, if the agent taps into an RSS feed, the url field shows the Internet address of the feed. To change a setting, simply click on its value. The text in the gray box on the right-hand side explains the meaning of the individual settings. You will find some other settings that go beyond those in Options . Pressing the small plus symbol adds a new setting.
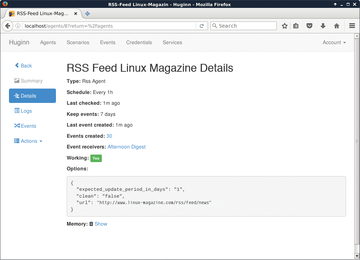
Clicking Dry Run checks whether the agent works as desired. The generated event appears in a new window, and the Logs tab collects any errors that occur. If everything works in the dry run, a click on Save finally creates the agent. If something goes wrong in spite of a successful dry run, you can edit the settings retroactively by selecting Agents (Figure 7) and then Actions | Edit Agent .
 Figure 7: If you click on the name of an agent under Agents, you are treated to an overview of all your settings and the generated events.
Pass Through
Events generated by RSS agents and others typically contain unformatted raw data. The EventFormattingAgent promises to beautify this data, but first it has to learn how the events it is supposed to process appear. To do this, go to the list to the right of Events and perform a Dry Run as described before. To experiment, you can trigger the latest run by pressing the Actions button in Agents at any time. For example, the Rss Agent produces an event like that in Listing 7 (excerpt) for each message in the RSS feed.
Listing 7
Event from an RSS Feed
01 [...]
02 {
03         [...]
04         "url": "http://www.linux-magazine.com/NEWS/Gartner-worldwide-server_sales_drop",
05         "links": [
06         {
07                 "href": "http://www.linux-magazine.com/NEWS/Gartner-worldwide-server_sales_drop"
08         }
09         ],
10         "title": "Gartner: Worldwide server sales drop",
11         "content": "        <p>\n\tAccording to Gartner, fewer servers were sold in the first quarter of 2017 than in the previous year. Bucking the trend, two Chinese manufacturers were able to substantially boost the number of units sold.    <\/p>",
12         [...]
13 }
14 [...]
With this knowledge in mind, create a new EventFormattingAgent – I am using the RSS Agent as an example. The idea is for the formatted information from the RSS feed to appear in the afternoon email.
The Afternoon Digest Agent would be the right choice under Receivers . The EventFormattingAgent later outputs the text stored after "message": in the Options box. You need to paste the information from the event into this text box using placeholders. The last placeholder uses the same name as the matching information in the event, but you need to wrap this name in double curly brackets.
In the example, the agent would swap the {title} placeholder with the Gartner: Worldwide server sales drop text. In other words if you add the text Linux Magazine reports: {{title}} in the message line, the email sent in the afternoon reads Linux Magazine reports: Gartner: Worldwide server sales drop .
After successfully creating the agent, ensure that the Rss Agent delivers its data exclusively to the EventFormattingAgent . If several agents are linked, it takes a while for Huginn to activate them. By default, the software forwards events once a minute.
Following the same principle, you can set up any number of additional agents and link them. The so-called trigger agent is particularly useful: It executes a freely selectable action as soon as a user-defined event occurs. Other interesting receivers besides the morning and afternoon digests include the Shell Command Agent , which launches a command-line command, and the Twitter Publish Agent , which outputs a tweet.
That said, some agents only work if you modify the accompanying .env configuration file up front – including, for example, all the Twitter agents. To get these up and running, you first need to register a new app on Twitter and add the credentials for the app to the .env file after TWITTER_OAUTH_OAUTH_KEY= and TWITTER_OAUTH_SECRET=. By the way, if you are familiar with Ruby, you can add their own custom-made agents to the existing collection [9].
« Previous 1 2 3 4 Next »
Buy this article as PDF
(incl. VAT)
Buy ADMIN Magazine
Subscribe to our ADMIN Newsletters
Subscribe to our Linux Newsletters
Find Linux and Open Source Jobs
Most Popular
Support Our Work
ADMIN content is made possible with support from readers like you. Please consider contributing when you've found an article to be beneficial.


