Click to the Future – Remote Desktop Based on HTML5
Remotely controlling applications in the browser is nothing new – it’s been possible ever since Google Apps. But, what if you want to serve up your own applications from the enterprise LAN or access your home desktop over the Internet? Terminal server technologies (like VNC and RDP) or VDI solutions (like VMware View or Citrix Xen Desktop) are the obvious choices. However, this approach typically involves installing the corresponding software client on the machine from which users want to access the remote application. If you do not trust the built-in encryption, or if none exists, you will soon see the need for a VPN client to provide encryption and authentication.
This is all very unfortunate, for example, if you are working on a computer in the hotel lobby or an Internet cafe and cannot install your own applications. For some years, “clientless SSL VPNs” have plugged this gap by providing browser-based access to remote applications over a secure HTTPS connection, without needing to install a client. However, these solutions typically impose specific requirements on the browser and plugins. Often you need Java, Flash, or ActiveX – and maybe even a specific version.
Better with HTML5
The alternative is Guacamole, an HTML5 web application that supports graphical access via remote desktop protocols (RDPs) directly in the browser, without the need for additional plugins. The program is licensed under the AGPLv3 and, in the current version 0.6.2, supports VNC and RDP – although with limited functionality in some cases. For example, you cannot transmit audio data or connect network drives over RDP.
On the server-side, the Java software runs on an Apache server with a servlet container (Apache Tomcat) and then acts as a proxy that translates graphical output from VNC and RDP into XML and vice versa (Figure 1).
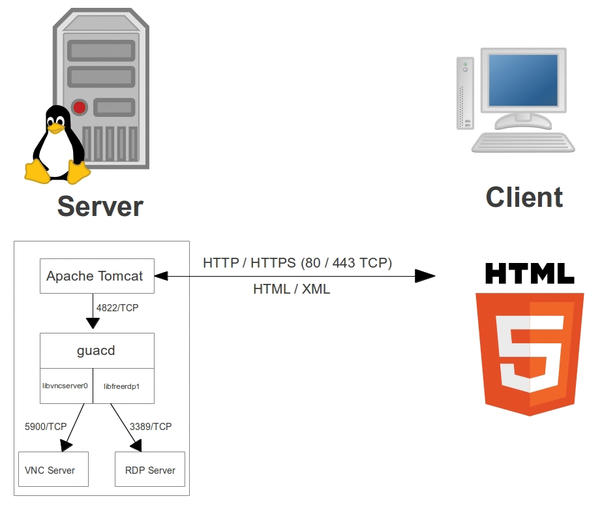 Figure 1: The sketch shows a functional diagram of Guacamole and its communication with RDP or VNC servers.
The desktops accessible via RDP or VNC can run either on the application server itself or on a different computer on the network. Guacamole promises near-native performance and offers international keyboard support and an on-screen keyboard, where you can use the mouse to simulate keyboard input.
Guacamole’s functionality relies on the <canvas> element in HTML5, which uses JavaScript to handle extensive graphical operations, including not only drawing lines, rectangles, arcs, and Bezier curves, but also rendering color gradients, transparencies, and text and – most importantly – scaling graphics in the PNG, JPG, and GIF formats. These are ideal conditions for rendering a desktop and applications in the browser. The prerequisite then is just a browser that supports the Canvas element. Most current browsers today can do this (apart from Internet Explorer 8 and 9), even though the W3C assumes that HTML5 will not be widely supported until 2014 (see the “HTML5-Capable Browsers” box).
Installing Guacamole
Fortunately, the Guacamole website has prebuilt packages for several distributions. The Downloads section of the website provides packages for Debian 6.0 (squeeze), Ubuntu 11.10/12.04, and Fedora 15/16/17. Alternatively, you can build Guacamole from the source code.
For a test, you will need Guacamole 0.6.2 on a recent (12.04.1 LTS) Ubuntu system. To do this, you must first meet the dependencies for Java, VNC, and RDP support, which is easily done:
sudo apt-get install tomcat6 libvncserver0 libfreerdp1
Next, download the prebuilt packages for Ubuntu 12.04 from the Guacamole project page at SourceForge and unzip the contents of the archive in your home directory. Go to the new directory,
cd guacamole-0.6.2-ubuntu-12.04-i386
and install the Guacamole packages. The following one-liner will do this:
sudo dpkg -i guacd_*.deb guacamole_*.deb libguac3_*.deb libguac-client-vnc0_*.deb libguac-client-rdp0_*.deb
If you only want to support VNC connections in the browser, you do not need to install the libguac-client-rdp0_*.deb package.
The Tomcat server now requires symbolic links: one to each of the files guacamole.war and guacamole.properties . Additionally, you need to add the tomcat6 user to the new guacamole-web group, which you can do automatically by installing the package:
sudo dpkg -i guacamole-tomcat_*.deb
Alternatively, the manual procedure is described on the Guacamole project website. Finally, reboot the Tomcat server and select yes at the prompt (Figure 2), or enter
sudo /etc/init.d/tomcat6 restart
to restart the Tomcat server at the command line.
Configuration
For access via Guacamole to the desktop to succeed, of course, you also need to share a desktop. During my test, I opted to share the desktop on a Windows 7 PC using the RDP protocol. This will work just as well with a real Windows terminal server or a computer on which the desktop is shared via a VNC server.
Next, you need to introduce Guacamole to the credentials of the remote desktop so that access via the browser will work. To do this, open the /etc/guacamole/user-mapping.xml file with your preferred editor (Figure 3), for example:
sudo vi /etc/guacamole/user-mapping.xml
Then, add the required data in the section:
<!-- Per-user authentication and config information -->
To do this, first remove the comment characters <!-- and --> .
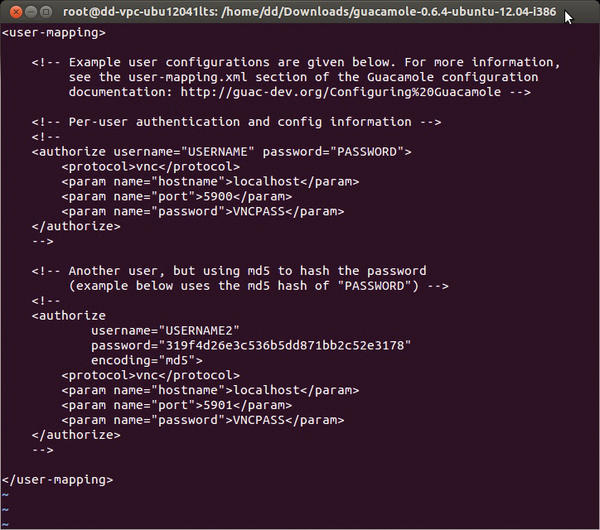 Figure 3: Users who need HTTP access to graphical desktops are added to the central user-mapping.xml configuration file.
In the example, I will set up a connection for user tom with a password of test on a Windows system with an IP address of 192.168.1.11 (Listing 1).
Listing 1: User Mapping
01 <authorize username="tom" password="test">
02       <protocol>rdp</protocol>
03       <param name="hostname">192.168.1.11</param>
04       <param name="port">3389</param>
05       <param name="password"></param>
06 </authorize>
If you prefer to use VNC, you can replace RDP in the protocol section with vnc . Next, store the password for the VNC server in the following section:
<param name="password"><MyVNCPassword>
</param>
Save the configuration file and enter
sudo /etc/init.d/guacd restart
to restart guacd .
Connecting to the Desktop
Make sure the machine you entered in user-mapping.xml is reachable with the corresponding protocol; then, access the address http:// IP address:8080/guacamole in your web browser. After successful authentication with the specified username and password, you should be able to log in to the desktop on the target system, as displayed in your browser (Figure 4). You can then log in with your Windows credentials.
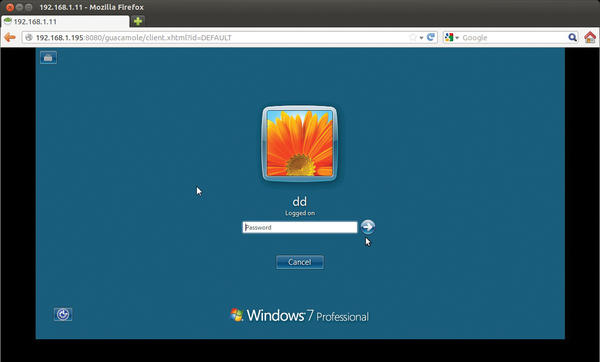 Figure 4: Thanks to HTML5, users no longer need plugins for graphical access to desktops in the browser.
Guacamole provides a simple clipboard for exchanging text data between the remote machine and the local system, as well as an on-screen keyboard – if you drag the mouse cursor in the direction of the browser’s address bar (Figure 5).
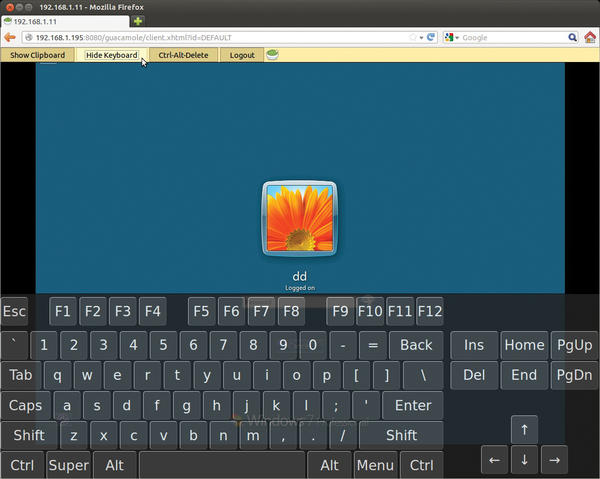 Figure 5: In addition to its own (text) clipboard, Guacamole offers an on-screen keyboard, with which you can enter text with a mouse.
If needed, you can send a Ctrl+Alt+Del to the remote machine or terminate the remote session with Guacamole.
Small Uncertainties
The default Guacamole setup works, but it is anything but secure because access to the login page is unencrypted. Thus, you are urgently advised to install Tomcat with SSL support. For a how-to, check out the detailed Tomcat documentation online. Another unfortunate feature is that the password for opening the connection to the RDP server and – if you use a VNC connection also the VNC password – are stored in the clear in the user-mapping.xml configuration file and can be read by the logged in user. Thus, you will want to change the owner and permissions for the user-mapping.xml file as follows:
sudo chown tomcat6.tomcat6 user-mapping.xml
sudo chmod 640 user-mapping.xml
Alternatively, Guacamole also offers the possibility of creating hashed passwords only in the config file. Listing 2 shows the corresponding section of user-mapping.xml for user tom and the MD5-hashed password secret .
Listing 2: Password with MD5
01 <authorize
02         username="tom"
03         password="b2016af253087887ccb510d7543ed514"
04         encoding="md5">
05     <protocol>vnc</protocol>
06     <param name="hostname">localhost</param>
07     <param name="port">5900</param>
08     <param name="password">123456</param>
09 </authorize>
You can quickly view the password hash at the command line with the md5sum utility:
echo -n <PASSWORD> | md5sum -t
319f4d26e3c536b5dd871bb2c52e3178  -
Next, add this hash value instead of the password to the configuration. Of course, the hashed password should be longer than eight characters and should be chosen to be as secure as possible with non-standard characters; simple passwords can be broken by brute-force crackers like mdcrack within a few minutes.
Sophos UTM 9.0
If you are worried about the overhead of setting up secure connections with Guacamole, you can, of course, also use commercial software. For example, the current version of the Sophos UTM 9.0 Firewall (formerly Astaro Security Gateway) provides an HTML5 portal that you can use to access services on the LAN without a client installation (also see the box “More HTML5 Remote Desktops”).
Besides RDP and VNC, Sophos supports connections to Telnet and SSH servers, as well as HTTP and HTTPS connections. That said, HTML5 remote access only plays a subordinate role in Sophos UTM. Again, you cannot use RDP to map drives on the clients. For fully transparent remote network access, Sophos UTM provides IPsec, SSL, PPTP, and L2TP VPN servers as alternatives. The HTML5 portal with KVM-only (keyboard, video, mouse) transmission is better suited to occasional remote management sessions with external service providers for which you do not want to design full-fledged VPN access.
Free Firewall and VPN
Sophos offers UTM 9.0 as a hardware appliance, virtual appliance, or software appliance for installation on your own hardware. Software and virtual appliances are available for download from the Astaro FTP server. Sophos grants registered users a free “Home Use License” for private, non-commercial use that has the full functionality of the commercial edition for up to 50 IP addresses (Endpoint Antivirus for 10 users). It includes the following modules:
- Network Security: Packet filtering, VPN, intrusion protection.
- Web Security: URL filters, Application Control, antivirus with HTTP, HTTPS, and FTP proxy.
- Mail Security: Anti-spam, antivirus with SMTP+POP3 proxy.
- Web Server Security: Web Application Firewall against cross-site scripting attacks, SQL-injection, and so on.
- Wireless Security: WLAN Controller for Sophos Access Points.
- Endpoint Antivirus: Antivirus and device control for Windows clients
To retrieve a license, first register online and then log in with your credentials. The free license is then available in “View License/Home Use License.”
Setting Up a User Portal
Because of the pre-built images for VMware, commissioning a Sophos UTM 9.0 with an HTML5 portal with VMware Player, VMware Workstation, or an ESX server, is easily done. If you prefer to run the virtual machine in VirtualBox, you can download the ISO image instead of the virtual appliance and bind it as a boot medium to a manually created virtual machine. After the installation, or the first launch of the VM, a simple setup wizard guides you through the configuration of the basic settings, such as assigning the admin password, setting up the Internet connection, enabling intrusion protection, setting up the proxies, and so on. At the end of this process, just install the Home Use License, and you’re ready to continue setting up the HTML5 portal.
The HTML5 VPN and user portals are integrated for user access to other features. For example, you can view your own spam quarantine, download preconfigured VPN clients, and access the HTML5 VPN portal. The first step thus enables the user portal in Management | User Portal and restricts it to individual networks and users as applicable.
Of course, you want users to be able to access the user portal off the Internet. For this reason, you will want to enter AnyIPv4 in Allowed networks and also check Allow all users . Next, in Definitions & Users | Users & Groups , add the users who will be accessing the user portal. Next, enable the HTML5 VPN portal in Remote Access | HTML5 VPN portal | Enable and create the connections to the internal services. To do this, click on New HTML5 VPN Portal connection , enter a name for the connection, and select the protocol – for example, Remote Desktop (Figure 6).
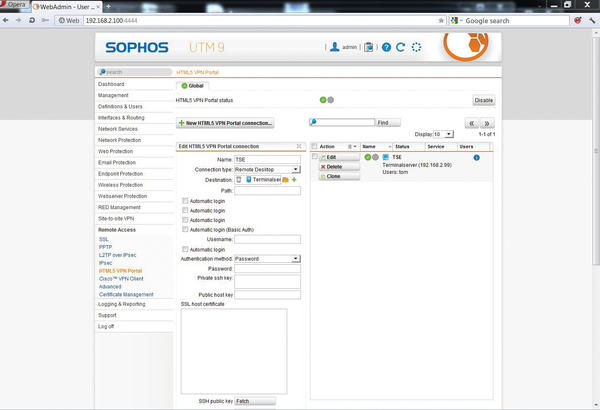 Figure 6: The new Sophos UTM 9.0 also offers an HTML5 portal for access to internal system resources in the browser.
Optionally, you can deposit the credentials; users can then log in to the terminal server directly via the HTML5 VPN portal. This approach is practical – who would want to trust an external user with an administrator account? Further down, you can assign the new connection to all users and networks or define restrictions. The connection is now ready for use. Legitimate users can log in to the user portal, which they reach via the URL https://<external IP address> . After successful authentication, users just click on HTML5-VPN-Portal and then click the Connect button next to the preconfigured connections.
Finally, I should also mention that, as a back-end system, Sophos UTM 9.0 supports a wide range of authentication solutions, including LDAP, Active Directory Single Sign-On, Novell eDirectory, and RADIUS. Because most two-factor authentication solution vendors (e.g., Vasco Digipass) use the universal RADIUS interface, access to the user portal can easily be protected with tokens.
Info
[1] HTML5 test suite
[2] ThinVNC
[3] noVNC
The Author
Thomas Zeller is an IT consultant and has been involved with IT security and open source for 15 years. He is the author/co-author of the books OpenVPN Compact and Mind Mapping with Freemind. In real life, he is the managing director of a medium-sized IT system integator, where he is also responsible for the IT security division.
Subscribe to our ADMIN Newsletters
Subscribe to our Linux Newsletters
Find Linux and Open Source Jobs
Most Popular
Support Our Work
ADMIN content is made possible with support from readers like you. Please consider contributing when you've found an article to be beneficial.


