« Previous 1 2 3 Next »
Server administration using Cockpit
Control Center
At the Control Stick
On its homepage, Cockpit shows you all the servers with which it is familiar (Figure 1). Immediately after installation, this is only the server on which Cockpit is running. At this point, however, newer versions of Cockpit always present information about the server.
The server selection is hiding behind the Dashboard (Figure 2). The server operator can add additional machines via Add Host – or via the plus symbol in the newer versions. To do this, Cockpit needs only the server's IP address or hostname and the administrator's username and password. The software then responds with this information on the new machine and requests the required information. If an errors occurs, but there is no error message, the server is then simply missing in the list.
 Figure 2: … you need to switch to the Dashboard in Cockpit 0.25. However, the differences operating the two versions are only marginal.
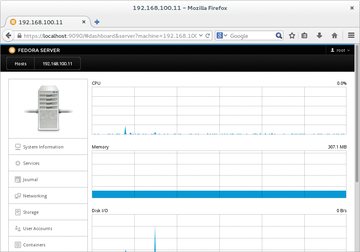
Select the server to be controlled by clicking on the corresponding line (localhost in Figure 1 ). Cockpit now provides updated information on the utilization of the most important hardware components every second (Figures 3 and 4). The menu on the left provides access to all the important functions and actions. For example, clicking Journal provides insight into the systemd journal, and you can manage user accounts under Tools | Administrator Accounts (Figure 3) or User Accounts (Figure 4).
 Figure 3: Cockpit 0.52 brings together all relevant information and functions on this overview page via the selected system, …
Cockpit keeps a breadcrumb bar in the black bar at the top of the page: Clicking one of the items leads back to the corresponding page. The list with all the servers is waiting behind Hosts (Figure 4) or Dashboard (Figure 3).
 Figure 4: … which the old version of Cockpit in Fedora 21 still distributes on both this page and the page behind the System Information menu item.
Function Queue
The user interface does not always make it clear which items can be clicked. If you access the Networking entry in the main menu, it is only possible to create a bonding, a bridge, or a new VLAN via the corresponding buttons.
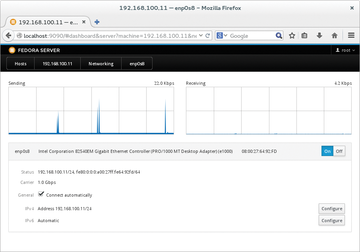
The remaining indicators provide information about the received and transmitted packages and the status of individual network interfaces. They can, however, also be clicked in the Interfaces list. There, you can then disable them (among other things) and set up the IPv4 and IPv6 addresses (Figure 5).
 Figure 5: You can set up the DNS server and routing using the Configure button (here in Cockpit 0.27).
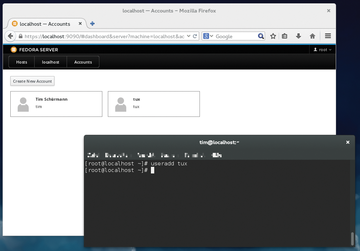
All the settings are self-explanatory; the possible actions are also very limited. You are, for example, neither allowed to view the user groups nor specifically assign groups to user accounts. However, you can fall back on the terminal in such cases. All maintenance work performed there is immediately reflected in Cockpit. A user account created by adduser appears shortly afterward behind the User Accounts
entry (Figure 6).
 Figure 6: The user account added via the command line by adduser also appears directly in Cockpit (here in version 0.27).
If you want to shut down or restart the server, in Fedora 21 call up the Hosts point. Or, in a current version of Cockpit, make your way to the corresponding server via the Dashboard. Either way, you will now discover a drop-down box – on the right-hand side in Fedora 21 and next to Power Options in current versions of Cockpit. In this way, you will reach the two functions.
Lifeline
A Rescue Terminal can also be opened in Fedora 21. In current versions of Cockpit, you need to call up Tools | Terminal . Cockpit then opens a shell within its own user interface; the shell can then be used to access the server directly. After finishing the work, you should log out again by clicking on an entry below your username at the top right.
« Previous 1 2 3 Next »
Buy this article as PDF
(incl. VAT)
Buy ADMIN Magazine
Subscribe to our ADMIN Newsletters
Subscribe to our Linux Newsletters
Find Linux and Open Source Jobs
Most Popular
Support Our Work
ADMIN content is made possible with support from readers like you. Please consider contributing when you've found an article to be beneficial.


